Thursday, December 29, 2011

Split Pea Soup


Not to brag, but, I think I make the best Split Pea Soup I have ever tasted.  I like a velvety-smooth soup with hearty vegetables and a warmth and flavor that just make it seam like everything will be okay.  Split peas are extremely inexpensive and have enough fiber and protean to make a nutritionist proud to recommend them.  Since everything else I put in this soup is good for you as well, the end product is a rich, warm, delicious, stick-to-your-ribs soup that is really good for your body.  


Serve this soup in a bread bowl, or with a roll.  If you need more, consider adding a salad.  This soup is best in the winter, but it is one that I make for my family all year long.  I hope you enjoy this as much as I do.


Split Pea Soup
Total Time: 2.5 Hours     Serves: 6
  • 1 Onion, chopped
  • 1 Ham Steak, cut into 1 inch pieces
  • 4 cans Chicken Broth
  • 4 cups Water
  • 1 pound (or 2 1/2 cups) Split Peas
  • 1-2 Bay Leaves
  • Pepper and Salt, to taste
  • 7 Carrots, peeled and cut into 1 inch pieces
  • 8 Potatoes, cut into 1 inch cubes


In large pot over high heat add ham and cook until some of the fat has been rendered. 


Add onion and cook until translucent, about 5 minutes.


Add chicken stock, water, peas, bay leaves and pepper; stir to combine.


Simmer, covered, for 1 1/2 to 2 hours, until the peas are very soft and become smooth in the broth when stired.


Bring soup to a boil and add carrots and potatoes. Boil for 30 minutes or until vegetables are tender.


Check seasonings adding more salt and pepper if necessary.

Thursday, December 22, 2011

Christmas Crepes


Crepes have been a part of my families Christmas tradition since I was old enough to make them myself.  Every Christmas Eve' we get together, I make the crepes, and everyone fills his or hers with the things that sound good to them.  We like hot fudge, raspberry pie filling, lemon curd, or for my husband and brother-in-law, lemon juice and powdered sugar.


When you make these, bear in mind that the first crepe of the batch almost always needs to be thrown away.  Call it a test crepe and don't feel bad about it. Other than that, crepes can be easy, fancy, and yummy.  I hope you enjoy making these as much as you do eating them.


Crepes
Prep Time: 1 hour    Makes: 12


2 Eggs
1/2 cup Water
3/4 cup Whole Milk
3 Tablespoons Butter, Melted
1 cup Flour
2 1/2 Tablespoons Sugar
1 Tablespoon Vanilla Extract


In a blender combine: eggs, water, milk butter, flour, sugar vanilla.  Blend until just mixed, about 10 seconds.


Rest batter in refrigerator for at least 1 hour or up to 48 hours.


To make crepes place 1/4 cup of batter into a nonstick skillet or crepe pan, over medium heat, liberally greased with butter.


Cook for about 30 seconds on the first side and about 10 seconds on the second side.


Fill with toppings of choice.

Thursday, December 15, 2011

Christmas Cookies


Christmas Cookies are a part of many families' traditions.  These are two of the cookies that my family makes every year.  The Spritz cookies keep well in a closed tin and we always color them to make them extra Christmasy.  The meringue cookies are light and sweet.   They are best the same day they are made, but can also be kept in an air-tight container for a few days.  

My family has so many Christmas food traditions, but this one has always been a favorite of mine.  Be sure to involve the whole family when making Christmas cookies, it is fun, and it will be a tradition that sticks around.


Spritz Cookies
Total Time: 1 hour     Makes: 36 Cookies
  • 3 Egg Yolks
  • 1 cup Butter, softened
  • 2/3 cup Sugar
  • 1 teaspoon Vanilla Extract
  • 2 1/2 cups Flour
  • Colored Sugar (optional)


Combine egg yolks, butter, sugar and vanilla in a medium mixing bowl and beat until combined with a hand mixer.

Gradually add flour while mixing and mix until combined.

Place dough into a cookie press and press cookies onto a cookie sheet.

If desired, top cookies with colored sugar sprinkles.

Bake at 400 for 7-10 minutes.


Chocolate Chip Meringue Cookies
Prep Time: 20 min     Makes: 24 Cookies
  • 3 Egg Whites
  • 1/4 teaspoon Cream of Tartar
  • 2/3 cup Sugar
  • 1 cup Chocolate Chips
In bowel of a stand mixer* add egg whites and cream of tartar, and beat just until soft peaks form.

Add sugar and beat until sugar is incorporated and soft peaks form.

Fold in chocolate chips.

Spoon meringue onto a greased cookie sheet (NOT and air-bake cookie sheet).

Place into an oven preheated to 400 and immediately turn oven off.  Leave cookies for 1 1/2 hours or overnight.

*These cookies can be easily made using a hand mixer.

Thursday, December 8, 2011

Farfalle with Vodka Sauce


There are two reasons I really like this sauce: first, it is easy to make without a trip to the store.  My house is always stocked with onion, garlic, and canned tomatoes.  By the way, did you know that canned tomatoes are usually the best tomatoes you can get for your family?  Tomatoes are a distinctly summer crop.  What you buy in the spring or winter is grown under conditions that just do not make for good food.  Now, summer is the time to make my capellini pomodoro, but, in the winter, when you cannot get decent tomatoes no matter how much you want to spend, don't turn your nose up at some canned tomatoes.  They were picked at the peak of freshness and canned the same day they were picked. Frankly, they are the freshest tomato you will buy outside of a farmers' market, but, I digress.  The second thing I like about this sauce is that it is really different from other pasta sauces.  If your family is like mine, you eat a lot of pasta and it is nice to have something different once in a while.   Well, the alcohol in this sauce takes flavors that are in tomatoes already and dissolves them so that you can taste them.  This makes for a previously undiscovered tomato taste!  I hope your family enjoys this taste experience.


Farfalle with Vodka Sauce
Total Time: 30 minutes     Serves: 4


  • 1 pound Farfalle Pasta, cooked
  • 1 Onion, diced
  • 2 cloves Garlic, pressed or minced
  • 1 Tablespoon Butter
  • 2 Tablespoons Olive Oil
  • 1 can (28 oz) Crushed Tomatoes
  • 1/4 cup Vodka
  • 1/4 teaspoon Red Pepper Flakes
  • 1/2 cup Cream
  • Pepper, to taste


In pan melt butter then add olive oil and onion, cook until onions are soft, about 5 minutes.


Add garlic, tomatoes, vodka and red pepper flakes.  Reduce heat to medium-low and simmer for at least 10 minutes.


To sauce add pepper and cream stir to combine and toss with pasta.

Thursday, December 1, 2011

Pot Roast


This recipe for pot roast closely follows one from the America's Test Kitchen Family Cookbook, but a lot of the fuss is taken out to make it easier.  As I reviewed the video to write the recipe I noticed that there are a few pieces of information missing, however they are all clarified in the recipe below.


Pot Roast has such a rich, deep, beefy flavor, there is nothing quite like it.  The only real work left in this recipe is the searing of the roast before turning it over to the oven.  Don't skip this step, it is more than worth the extra effort.  Finally, when you take the roast out of the oven it will be so tender that it will probably fall apart on you.  A decent butcher will tie the roast up for you, but, if you are like me you won't mind it falling apart.  Before you serve the roast, do your best to cut it against the grain.  Many people think that because the meat falls apart it will be tender, but the long grains of the meat are still not as pleasant to chew as they are if the meat is sliced against the grain.  This too is more than worth the effort required.


With these tips, your pot roast is sure to be easy, and guaranteed to be a hit with anyone who likes beef.


Pot Roast
Total Time: 5 hours     Serves: 6 to 8
  • 3-4 pound Chuck Roast
  • 1 large Onion, chopped
  • 2 medium cloves Garlic, chopped
  • 1 large Carrot, chopped
  • 1 stalk Celery, chopped
  • 1-2 Tablespoons Vegetable Oil
  • 2 teaspoons Sugar
  • 1 teaspoon Thyme
  • 1 can Chicken Broth
  • 1 can Beef Broth
  • 2 pounds Potatoes, peeled and chopped
  • 1 pound Carrots, peeled and chopped
  • Salt
  • Pepper

Season roast with salt and pepper on both sides. 


To a very hot pot add oil, and sear roast on all sides.  Once seared remove roast from pot and set aside.


Add onion, garlic, carrot, celery, sugar, thyme, chicken broth and beef broth to the pot, stir to combine.


Place roast back in pot, cover and cook at 300 for 3.5 hours.


Add potatoes and carrots to pot and cook for 1 hour.

Tuesday, November 22, 2011

Pecan Pie


In honor of the Thanksgiving holiday, I am posting early this week.  If you are looking for an alternative to pumpkin pie, pecan pie is a wonderful choice.

This recipe uses a shortbread crust, adding a little extra buttery-richness.  if you prefer a standard pie crust try the one used here.

According to my husband there is only one thing to say about this pecan pie, "Delicious!"  In fact he asks for it for his birthday every year instead of cake, and is a holiday staple at our house.

Wishing you a simply good Thanksgiving!


Pecan Pie
Prep Time: 1 hour     Serves: 8
  
For Crust:
  • 2 cups Flour
  • 1/2 teaspoon Salt
  • 2 Tablespoons Sugar
  • 14 Tablespoons Butter, cut into pieces
  • 1 Egg Yolk
  • 2 Tablespoons Ice Water

For Filling:
  • 3 Eggs
  • 2/3 cup Sugar
  • 1 cup Light Corn Syrup
  • 1 teaspoon Vanilla
  • 1 teaspoon White Vinegar
  • 1 cup Pecans
  • 3 Tablespoons Butter, cut into pieces

Crust:

In bowl of food processor combine flour, salt and sugar; pulse to combine.

Add butter to food processor and pulse until pea sized crumbs form.

Add egg yolk and water and pulse just until in holds together when squeezed.

Turn dough out onto plastic wrap, wrap, shape into ball and refrigerate for 1 hour.

Roll out crust and place in 9 inch pie plate.

Filling:

In mixing bowl beat eggs until light and foamy.

Add sugar, corn syrup, vanilla and vinegar; beat until combined.

Stir in pecans.

Pour filling into unbaked crust.

Dot top of pie with pieces of butter.

Bake at 350 for 30-40 minutes, or until center of pie "jiggles" when shaken.

Thursday, November 17, 2011

Buttermilk Biscuits


This recipe is an adaptation of one Alton Brown does on his show Good Eats (original recipe).  It is simple, fast, easy and reliably delicious.   I have been using it as my only biscuit recipe for over 5 years.  I have successfully made it substituting milk with a tablespoon of lemon juice for the buttermilk.


These biscuits are a great holiday side, but also are great with fried chicken or with butter and jam.  The secret is to not over mix them, ensuring that they come out tall and fluffy.  In the spirit of Alton Brown, I wish you "good eats" this holiday season.  


Buttermilk Biscuits
Prep Time: 30 min     Makes: 12


2 cups Flour
4 teaspoons Baking Powder
Pinch of Baking Soda
1/2 teaspoon Salt
2 Tablespoons Butter, cut into cubes
2 Tablespoons Shortening, cut into cubes
1 cup Buttermilk
1-2 Tablespoons Butter, Melted


In bowl of food processor combine flour, baking powder, baking soda, salt, butter and shortening.


Pulse until dough has the consistency of large crumbs


With food processor running add buttermilk mixing until just combined.


Turn dough out onto well floured surface and pat out by hand to a thickness of 1/2-1 inch.


Cut out biscuits and place on cookie sheet with the sides just touching.


Continue to pat out dough and cut biscuits until dough is used up, working dough as little as possible


Gently press your thumb into the center of each biscuit.


Brush melted butter over the top of biscuits.


Bake at 400 for 15-20 minutes.

Wednesday, November 9, 2011

Thanksgiving Sweet Potatoes


This is a very pretty, simpler, cleaner version of the traditional sweet-potato casserole with the marshmallows on top.  The cranberries balance the sweetness of the syrup and the potatoes to make for a more grown-up holiday dish that tastes as good as it looks.


This recipe has been a holiday staple for my family ever since I first tried it several years ago.  The dish would feel at home for a family feast or a holiday party.  Enjoy.


Thanksgiving Sweet Potatoes
Prep Time: 30 min     Serves: 6-10


3-4 lbs Sweet Potatoes, peeled
1/4 cup Maple Syrup
3/4 cup Pancake Syrup
1 Tablespoon Butter
1 1/2 cups Fresh Cranberries


Boil whole sweet potatoes until tender, about 30 minutes.  Drain off water and allow potatoes to cool.


In small saucepan combine maple syrup and pancake syrup and heat on medium-low until reduced by half.


Add butter and cranberries to syrups, simmer for about 5 minutes, until the cranberries begin to pop open.


Slice cooled sweet potatoes into 1/2 inch rounds, and arrange in ceramic tart dish or casserole.


Pour cranberry glaze over sweet potatoes.


Bake at 400 for 20 minutes.


Linking Up With:
Ultimate Recipe Swap @ Life As Mom

Thursday, November 3, 2011

Thanksgiving Pumpkin Cookies


For my husband, there is only one kind of cookie worth eating: warm chocolate chip cookies.  So any time I try to suggest making a new cookie recipe he suggests that I make my normal chocolate chip cookies.  The first time I made these was a few years ago.  I made over 100 cookies for my sister's baby shower, and my husband must have eaten 50 of them.  


Reminiscent of pumpkin cheesecake, these cookies are moist, sweet, and packed with pumpkin flavor.  Even though they are a little extra work, they are definitely worth the effort.  


If you are making a lot of cookies you can use the squares of parchment several times.


I hope your family has as much fun eating these cookies as they do making them.


Pumpkin Cookies With Cream Cheese Filling
Total Time: 2 hours     Makes: 24-30 sandwiches


For Cookies:
1 cup Brown Sugar
1 cup Sugar
1 cup Vegetable Oil
1 can (15 oz.) Pumpkin Puree
2 Eggs
1 teaspoon Vanilla Extract
3 cups Flour
1 teaspoon Baking Soda
1 teaspoon Baking Powder
1 Tablespoon Cinnamon
Pinch of Ground Cloves
Pinch of Nutmeg


For Filling:
1 stick Butter
8 oz Cream Cheese
1 pound Powdered Sugar
1 teaspoon Vanilla


Cookies:
In large mixing bowl combine: brown sugar, sugar, oil and pumpkin.  Mix until well blended.


Add eggs one at a time.  Stir in vanilla.


In medium bowl add: flour, baking soda, baking powder, cinnamon, cloves and nutmeg.  Whisk together with fork.


Gradually mix dry ingredients into wet ingredients.


Pipe batter in spirals onto 2 inch squares of parchment paper.


Bake at 400 for 11 minutes.


Transfer cookies to a cooling rack to cool.


Filling:
Beat butter until fluffy.


Add cream cheese to butter and beat together.


Slowly add powdered sugar until incorporated.


Stir in vanilla.


If frosting is too thick add cream or milk a few drops at a time until they are the correct consistency.


Spread frosting on bottom of cookie and top with another cookie.


Linking Up With:


Three Weeks of Thanks @ The Artsy Girl Connection
Ultimate Recipe Swap @ Life As Mom

Tip Junkie handmade projects

Thursday, October 27, 2011

Artisan Bread


I developed my interest in baking bread while living in a house that was so cold I baked bread to get warm.  Our house was so cold that bread would not rise on the counter so I had to turn the oven on low and then turn it off with the bread inside in order for the bread to rise.  


I got a book for Christmas called Artisan Bread in Five Minutes a Day.  It took a little while to work out a system that I liked, and I had to practice a while before the bread was really good, but now it warms both my home and my tummy.  


This is the easiest way I have ever seen to make bread.  There is no kneading, and it only takes a few minutes to get ready.  The only down side is that you really have to start this bread at least 10 hours before you want to eat it.  On the good side, you CAN make it two whole weeks before you want to eat it, so, if you like bread frequently you can make a week worth of dough and have fresh bread with relatively little planning.


This bread is soft but dense with a moist crumb, a hard crust, and a very wonderful taste.  


Happy baking and happy eating.


Recipe and method are adapted from Artisan Bread in Five Minutes a Day by Jeff Hertzberg and Zoe Francois.


Artisan Bread
Prep Time: 30 min     Makes: 4 small loaves


  • 3 cups hot tap Water
  • 4 1/2 teaspoons Salt
  • 4 1/2 teaspoons dry active Yeast
  • 6 1/2 cups Flour
  • Cornmeal, for pan


Add salt and yeast to water and stir to combine.


Place flour in the bowl of a food processor*, with food processor running add water and yeast mixture.  Mix until combined, about 30 seconds.


Place dough in a large bowl or container (5 quarts or larger) and leave to rise at room temperature for about 2 hours, or until dough had doubled in size.


Place dough in refrigerator over night and for up to 2 weeks.


Take out 1/4 of the dough and place on floured surface, or in a bowl of flour.  Lightly coat dough in flour.


Form loaf by pulling the dough down and tucking the "corners" underneath.


With a lightly floured knife cut a few slashes into the dough.


Place loaf on a cornmeal coated cookie sheet, and allow to rise for 40 minutes.  (preheat oven about 20 minutes into rising time)


Bake at 450 for 30 minutes.


* If you don't have a food processor this can be done in a stand mixer with the flat beater attachment or by hand but is quite labor intensive.  I would not recommend a hand mixer as the dough will be much to thick for most hand mixers.


Linking Up With:

Tempt my Tummy TuesdaysHookingupwithHoH

Thursday, October 20, 2011

Chili


Chili - is anything else this healthy so fulfilling and delicious?  Beans are high in protein and fiber, and together with tomatoes, onions, and lean ground beef, they make for a nutritious meal.  The trick is that the meal has all the right components to fill you up - and keep you full for a long time: fiber, protein, and a little bit of fat.  


Nutrition aside, this meal is also really inexpensive.  I often make it with dry beans which has the added advantage of letting you try a few of many different beans.  Where I like to buy my groceries you can buy about 10 different varieties in bulk, I like to get a little bit of 3 or 4 different kinds, just to make the chili look more diverse.  If you use dry beans, the whole recipe can be made for about $4.  That's right $4 to feed 6 adults.


Now, I know most people don't look at a blog and think to themselves "mmm, that recipe looks so cheap and healthy; I bet my family would love it" but, I get excited, so, sorry if I went in too deep.  You can be sure that even if this chili was expensive and terrible for you, I would still make it, it is just that good.  My husband adds about 1 Tablespoon of red pepper flakes to this recipe to make it hot enough for himself.  I hope you and your family enjoy and be sure to come back next week for my bread which makes a great side for this dish.


Chili
Total Time: 1 hour     Serves: 6

  • 1-2 Tablespoons Vegatable Oil
  • 1/2 pound Ground Beef
  • 1 Onion, finely chopped
  • 1 can Diced Tomato
  • 1 can Beef Broth
  • 2 cans Chili Beans
  • 4 cans Kidney Beans, drained
  • 2 teaspoons Oregano
  • 1 teaspoon Garlic Powder
  • 1-2 Tablespoons Paprika
  • Pinch of Cayenne
  • Pinch of Salt
  • Pepper


To hot pot add oil and beef, cook until beef is browned.


Add onion, and cook until translucent and soft, about 3 minutes.


Add beef broth, tomatoes, beans, oregano, garlic powder, paprika, cayenne, salt and pepper.  Stir to combine.


Reduce heat to low and simmer for at least 20 minutes.

Saturday, October 15, 2011

Pumpkin Spice Latte


This bonus post is in celebration of a visit from our local newspaper, which wrote a piece about our show. To see the article, click here.


When it gets cold outside I love to indulge in hot drinks. Whether it is a nice hot cup of tea, or a Pumpkin Spice Steamed Milk, something about a hot drink on a cold day just makes everything better than it was before. The syrup from this recipe can be used with coffee or steamed milk.


The syrup recipe can be easily multiplied and kept in the refrigerator for up to two weeks.  To use refrigerated syrup simply shake and add hot drink straight from the fridge. I hope this recipe warms your fall and protects your wallet.


Pumpkin Spice Latte
Total Time: 30 min     Serves: about 5

Pumpkin Spice Syrup:

  • 1/2 cup Water
  • 1/2 teaspoon ground Nutmeg
  • 1 Cinnamon stick
  • 1 whole Clove
  • 1/4 inch slice of fresh Ginger, peeled
  • 2 Tablespoons canned Pumpkin puree
  • 1/2 cup Sugar


Latte:

  • 3/4 cup (6 oz) Strong Coffee (1.5 times the package directions) or Espresso
  • 3/4 cup Milk (6 oz)
  • Whipped Cream and Ground Cinnamon (optional)


For Syrup:


Place nutmeg in a coffee filter in tie into a pouch with butcher's twine or other food safe string.


In a small sauce pot with lid combine: water, nutmeg pouch, cinnamon stick, clove and ginger.


Bring to a boil.


Stir in pumpkin, reduce heat to low and simmer for 20 minutes.


Remove spices from pot.


Stir in sugar, keeping over low heat until sugar has completely dissolved.


For Latte:


Heat milk in microwave for about 1 minute or until hot.


Froth milk if desired.


Add coffee.


Stir in 1-2 Tablespoons of syrup and top with whipped cream and ground cinnamon if desired.


Linking up with:
Tip Junkie handmade projectsIhookedupwithHoHlamespiceCatch a Glimpse ButtonWeekend Bloggy Reading

Thursday, October 13, 2011

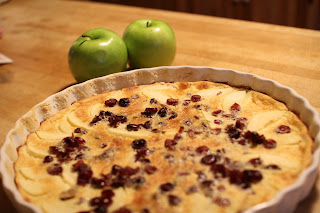
Apple Cranberry Flaugnarde


I usually make this dish for dessert, it is sort of a cross between a fruity pancake and a custard.  My husband loves it.  A Flaugnarde is also a great dish for a weekend breakfast or brunch.  I have made Flaugnarde for my husband for each of his promotions for the last several years as a nice way to celebrate.


This recipe serves 8-10 making it perfect for a dinner party, holiday get-together, or for a family to enjoy for dessert one night and breakfast the next morning.  I hope you enjoy.


Apple Cranberry Flaugnarde
Prep Time: 30 min     Serves: 8 to 10 for dessert


  • 1/2 cup Dried Cranberries
  • 2 cups boiling Water
  • 1 Apple, peeled, cored and sliced in 1/4 inch slices
  • 3/4 cup Milk
  • 3/4 cup Cream
  • 2 Eggs
  • 1 teaspoon Vanilla Extract
  • 1/4 cup Flour, plus more for dusting
  • 1/4 cup Sugar
  • Pinch of Salt
  • Butter to grease dish


Butter and flour tart dish or large pie plate and set aside.


Cover cranberries with boiling water and let sit for 10 min.


Arrange apple slices in tart dish.


In blender combine: milk, cream, vanilla, flour, sugar and salt.


Blend until smooth, about 1 minute.


Carefully pour batter on top of apples.


Strain cranberries and sprinkle over batter.


Bake at 400 for 25 minutes.


After baking let sit for at least 15 minutes before serving.


Linking Up With:


Ultimate Recipe Swap @ Life As Mom
Recipe Swap @ The Grocery Cart Challenge

Tip Junkie handmade projectsMandy‘s Recipe BoxTempt my Tummy TuesdaysNap-Time CreationsCatch a Glimpse Button

Thursday, October 6, 2011

Tortellini Soup


I started making Tortellini Soup in college, and now it is one of the first soups I make every fall and one of the last I make every spring.  This is one of the easiest meals I can make, it goes together really quickly, and the whole family loves it.  This soup makes a meal when served with warm bread, or a fancy soup course for a meal of chicken or steak.  Tortellini Soup reheats well, and it is great for picnics and outdoor meals because it retains its heat for a long time. 

Tortellini Soup
Total Time: 30 min     Serves: 4 main course 8 appetizer


  • 1 package (20 oz) Tortellini pasta 
  • 4 cans (10 3/4 oz) Condensed Tomato Soup
  • 2 cans (14 oz) Chicken Broth
  • 1 teaspoon Garlic Powder
  • 1 teaspoon Onion Powder
  • 1 Tablespoon Italian Seasoning
  • Pepper, to taste
  • 2 cups Italian cheese, grated (one pre-packaged bag)
  • 3 cups Milk (or two soup cans full)


Put medium pot of water on to boil.


In large pot stir together tomato soup, chicken stock and seasonings.  Bring to a boil.


When water in medium sized pot is boiling add tortellini and cook until all the tortellini's float.


Add cheese to soup, stirring to combine.


Reduce heat to low, add milk and cooked tortellini to soup, and stir to combine.


Check for seasoning and serve with grated cheese on top.


Linking up with:


Tip Junkie handmade projectsHookingupwithHoHCatch a Glimpse ButtonWeekend Bloggy Reading